
Welcome to the Kid’s Corner
Hey Kids! Do you like to explore your backyard? We will tell you all about the critters in your yard and show you how to do crafty projects, too. It’s fun to help Mom and Dad in the garden and we’ll show you how to grow fun and easy plants to EAT!
Critters in the backyard

Worms!
If you are lucky enough to have worms in your garden soil, help to keep them around by burying shredded paper and kitchen scraps from veggies and fruits (except for citrus). They will eat these things and then turn them into vermicompost which will then feed your plants in the garden and make it grow!
There are four types of worms you might find in garden soil. Red worms, Manure worms, Garden worms and Nightcrawlers: and they all till the soil.
The worm passes through the soil, eats its own weight and then leaves behind worm manure called castings.
Some soils like scratchy, sandy soil are not a good environment for worms, like in Florida. But you can still keep worms in a worm bin. As long as you feed them and keep them moist, they will live there and multiply.
If you go to the PROJECTS page, there are do-it-yourself instructions on how to make worm bins from big tubs.
Create
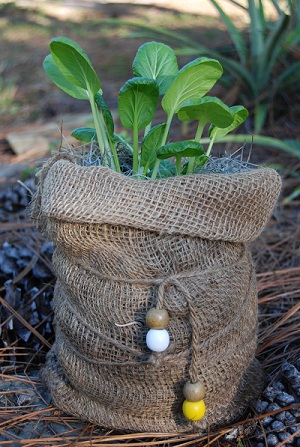
Burlap Sack Pots
Growing Veggies when you don’t have a garden and very space is easy in pots. And you can make really cheap ones yourself.
Here’s what you will need:
- 1 yard of burlap purchased at a garden supply store
- Small bag of potting soil or garden soil
- Desk stapler and staples
- Twine about 3-4 yards
- Beads or other waterproof decoration to tie on
- Veggie seeds or 1-2 plants
- Cardboard from a shipping box
Here’s what to do:
- Outline an inverted pot or saucepan lid on the cardboard and cut out.
- Fold burlap in half. Measure a length that will wrap around the cardboard circle + add 3 inches, cut off excess.
- Fold the piece in half and staple the raw edge side together all the way down and 1 inch in. Staples should be around 1-2 inches apart.
- Staple the botton edges together the same way.
- Turn the burlap sack inside out so the raw edges are on the inside.
- Put the cardboard circle in the bottom of the sach and fuss a little so that it lays flat.
- Fold over the top edge so the ‘pot’ is the height you wish.
- Fill with soil halfway, put in plants and then fill in soil around the plants up to the bottom leaves. Be gentle…
- Now take the twines and wrap it around the top to center of the sack to help keep its shape.
- Tie a knot with the two ends of twine and add decoration and tie knots to hold.
- Water well and let your new potted plant rest out of sunlight for a few days. Place a plate or dish under your burlap pot if put on a surface that cannot get wet.
In the Kitchen
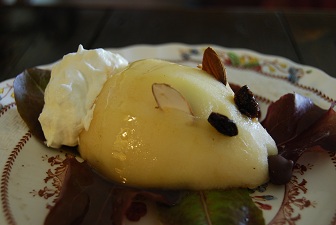
Pear Bunny Salad
What you will need:
- 1 large ripe pear, chilled
- 2 raisins
- 1 chocolate chip or gumdrop
- 1 almond
- 1 spoonful of yogurt, cottage cheese or whipped cream
What to do:
- Have an adult peel, spoon out core, and halve the pear.
- Place each half on a few lettuce leaves.
- Cut slits into the smaller side of the pear where a bunny’s eyes and ears would be.
- Slide the almonds into the ear slits, the raisins into eye slits to hold them in place; you may need to hold the slit open the end of a knife to do this.
- Cut a notch in the end where the bunny’s nose would go and place the chocolate chip or gumdrop.
- Scoop the spoonful of yogurt, cheese or whipped cream onto the other end of the bunny for the tail.
- Now you are ready to eat the bunny!
If your pear has a short neck like mine did, your bunny may look more like a mouse, but still just as yummy!